Storyteller, All Puzzles Solved Solution Walkthrough
“Storyteller” is a captivating and concise puzzle game that invites players to embark on a literary journey akin to flipping through the pages of a captivating book. This virtual tome is elegantly divided into thirteen distinct Chapters, each presenting a unique blank canvas waiting to be filled with your creative storytelling prowess.

With a deftly designed pointer at your command, you wield the power to weave intricate tales by skillfully arranging scenes and characters within a limited number of vignettes. The ultimate aim? To craft a narrative that mirrors the enigmatic title adorning each page. As you gracefully complete these Titles, numbering a total of 51, you accumulate an equal number of Crowns—a symbolic currency that bestows upon you the coveted title of “Storyteller.” This achievement unlocks the gateway to the game’s conclusion, where you are treated to the closing credits, gracefully tucked away on the final page of this digital literary adventure.
In “Storyteller,” you are not just a player; you are an artisan of tales, wielding your creativity to unlock the secrets of this digital storybook and earning the right to witness its grand finale.
Storyteller Complete Walkthrough- All Chapters Solved
Storyteller Chapter 1 – Life and Death
1. Love

I’m glad to provide you with the correct layout for the initial puzzle in the first chapter of the game “Storyteller,” titled “Life and Death.” As mentioned, this puzzle is relatively straightforward, and you won’t need to manually select scenes as the game provides guidance. Here’s the correct layout:
| Instructions for Scene Sequence: 1st Square: Begin by placing Adam in solitude. 2nd Square: Progress the story by introducing Eve to accompany Adam. 3rd Square: Conclude the tale by positioning Adam on the grave, with Eve by his side. |
By arranging the characters in this order, you should be able to progress through this part of the game
smoothly. Enjoy playing “Storyteller”!
2. Heartbreak
- Title: ‘”Eve Dies Heartbroken“
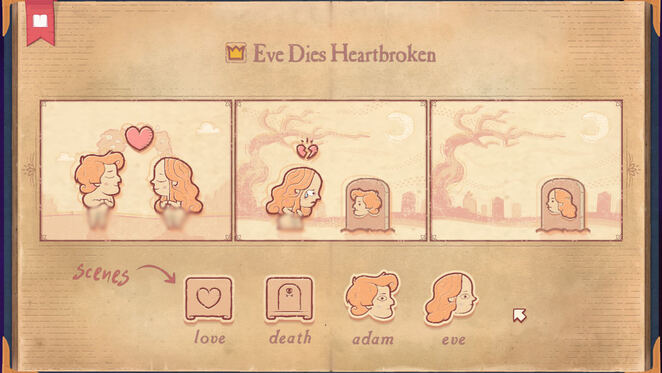
| Instructions for Scene Sequence: 1st Square: Commence with the Death scene. Position Adam on the grave, with Eve by his side. 2nd Square: Continue by adding the Death scene. Gently place Eve on the grave. 3rd Square: Conclude the narrative with the Death scene, gently laying Eve on the grave once more. |
3. Afterlife
- Title: “Seeing the Ghost of a Lover“

| Square Order – What You Must Do: Add the Love scene with Adam and Eve. Add the Death scene. Put Adam on the grave with Eve next to him. Add the Love scene. Place Adam with Eve. |
Storyteller Chapter 2 – Broken Hearts
1. Recovery
- Title: “A Heartbreak is Healed“

| Square Order – What You Must Do: 1. Begin with a Wedding scene and introduce two characters. 2. Transition to a Death scene. Position one of the characters from the previous scene by a grave and place the other character beside them. 3. Return to the Wedding scene once more. Position the surviving character from the previous scene alongside a new character. Healing a broken heart involves revisiting moments of love, loss, and new beginnings. |

| Instructions: Step 1: Begin with the Wedding scene. Introduce two characters. Step 2: Continue with the Wedding scene. Bring in one of the characters from the previous scene. Introduce a new character to the scene. Step 3: Proceed with the Wedding scene. Place the heartbroken character from the previous scene. Introduce the fourth character. |
2. Miracle
- Title: “A Heartbreak is Healed“
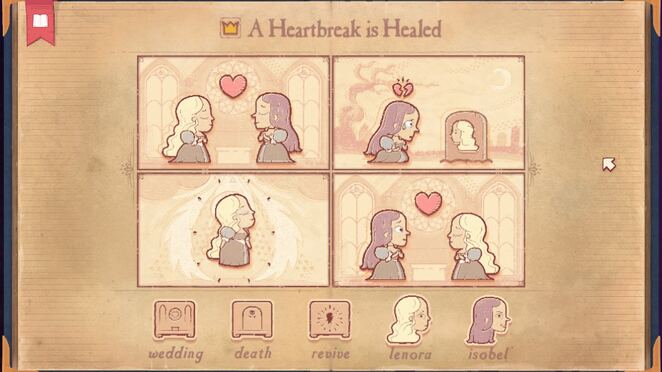
| Square Order – Steps to Follow: Start with a Wedding scene and introduce two characters, Lenora and Isobel. Transition to a Death scene. Place one character by the grave and the other beside her. Move on to the Revive scene. Position the character who was on the grave. Return to the Wedding scene, reuniting Lenora and Isobel. This narrative takes you through a rollercoaster of emotions, from love and loss to the possibility of healing and reunion. |
3. Unlucky
- Title: “Everyone Rejects Edgar“

| Square Order – Steps to Follow: Begin with the Wedding scene, introducing two characters excluding Edgar. Continue with the Wedding scene, this time placing one of the previous characters alongside Edgar. Progress to another Wedding scene, adding the other character from the first square to join Edgar. Transition to the Death scene. Position one of the characters from the first square at the grave and place the other character next to them. Return to the Wedding scene, positioning the surviving character from the 4th square. Place the last character next to them. Conclude with another Wedding scene, positioning the last character next to Edgar. This sequence tells the poignant tale of Edgar’s rejection and the complexities of his relationships. |
4. Grief
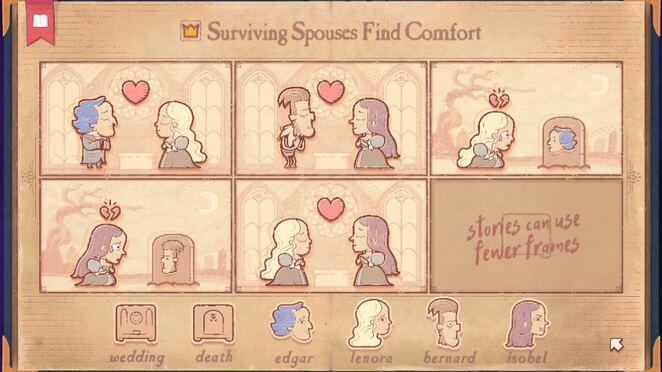
| Instructions for Scene Sequence: 1st Square: Begin with the Wedding scene. Introduce and position two characters within this scene. 2nd Square: Continue with the Wedding scene. Introduce and place the remaining two characters within this square. 3rd Square: Transition to a scene involving a character from the 1st square. Show this character near a grave, with the other characters from the 1st square gathered nearby. 4th Square: Replicate the 3rd square but with the characters from the 2nd square. Illustrate the character from the 2nd square near a grave, with the other 2nd square characters nearby. 5th Square: Return to the Wedding scene. Position the surviving characters from the 3rd and 4th squares next to each other in this final scene. |
Storyteller Chapter 3 – Apparitions
1. Revelation
- Title: “Edgar Shocks Himself“

| Instructions for Scene Sequence: 1st Square: Commence with the Death scene, featuring Edgar positioned on the grave. 2nd Square: Transition to the Amnesia scene, where Edgar is at the center. 3rd Square: Conclude with the Mirror scene, starring Edgar. |
2. Dismay
- Title: “Rejected by Own Spouse“

| Instructions for Scene Sequence: 1st Square: Begin with the Wedding scene. Introduce two characters in this square. 2nd Square: Transition to the Death scene. Place one character from the previous step on the grave, and position the other character next to them. 3rd Square: Return to the Wedding scene. Place the surviving character from the second square alongside the remaining character. 4th Square: Progress to the Revive scene. Revive the character on the grave from the second square. 5th Square: Conclude with the Wedding scene. Feature Edgar in this scene along with the character who was part of the first square. |
3. Reunion
- Title: “Heartbroken Spouses Are Reunited“

| Instructions for Scene Sequence: 1st Square: Commence with the Wedding scene. Introduce Edgar and Lenora. 2nd Square: Transition to the Death scene. Place Lenora on the grave and position Edgar next to her. 3rd Square: Continue with the Revive scene, focusing on Lenora. 4th Square: Return to the Death scene. Place Edgar on the grave and position Lenora next to him. 5th Square: Proceed with the Revive scene, this time centering on Edgar. 6th Square: Conclude with the Wedding scene, reuniting Edgar and Lenora. |
4. Calamity
- Title: “Heartbreak for Everyone“

| Instructions for Scene Sequence: 1st Square: Begin with the Wedding scene. Witness Edgar marrying Lenora. 2nd Square: Transition to the Death scene. Lay Edgar on the grave and position Lenora beside him. 3rd Square: Continue with the Wedding scene. Place Lenora next to Isobel. 4th Square: Return to the Death scene. Lay Lenora on the grave and position Isobel beside her. 5th Square: Progress with the Revive scene, focusing on Edgar. 6th Square: Conclude with the Wedding scene, reuniting Lenora and Edgar. |
Storyteller Chapter 4 – The Cellar
1. Poison
- Title: “Lenora Drinks Poison“

| Square Order – Steps to Follow: Begin with the Wedding scene. Position Lenora alongside either Edgar or Bernard. Move on to the Death scene. Place Lenora next to the grave and the other character from the first square on the grave. Conclude with the Poison scene involving Lenora. This sequence narrates the dramatic and fateful events surrounding Lenora’s choice to drink poison. |
2. Tragedy
- Title: “Double Poison“

| Square Order – Steps to Follow: Start with the Wedding scene. Position Edgar and Lenora. Proceed to the Death scene. Place one character on the grave with the other next to them. Transition to the Poison scene. Put the surviving character from the second square here. Continue with the Revive scene. Place the character on the grave from the second square. Return to the Death scene. Position the character from the third square on the grave and the one from the fourth square beside them. Conclude with another Poison scene. Place the surviving character from the fifth square. This narrative sequence presents a chilling tale of poison, death, and revival. |
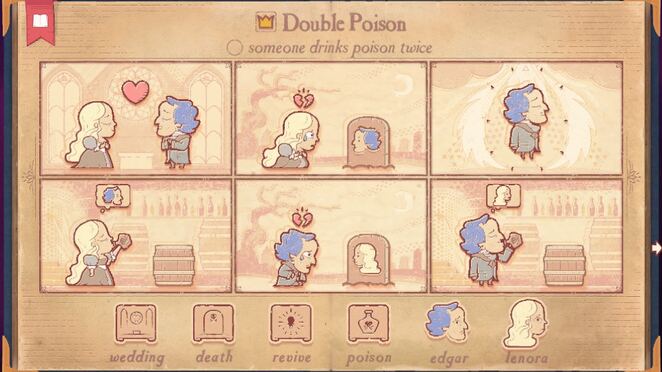
| Square Order What You Need to Follow Steps 1-4: Follow the instructions from the previous scenario. Step 5: Incorporate the Death scene. Position the character who was previously at the grave in the second scene back on the grave. Introduce the remaining character next to them. Step 6: Include the Poison scene. Place the surviving character from the fifth square. |
3. Wrath
- Title: “Isobel Remarries”

| Square Order – Steps to Follow: Begin with the Wedding scene. Place Isobel alongside Edgar or Lenora. Move on to the Fight scene. Have the two characters from the first square confront each other. Transition to the Poison scene with Isobel. Continue with the Wine scene. Position the character from the second square that you didn’t use in the third square. Conclude with another Wedding scene. Place Isobel with the character you didn’t use previously, symbolizing her remarriage. This sequence unfolds the story of Isobel’s remarriage, filled with drama and unexpected turns. |
4. Envy
- Title: “Isobel Commits a Crime”
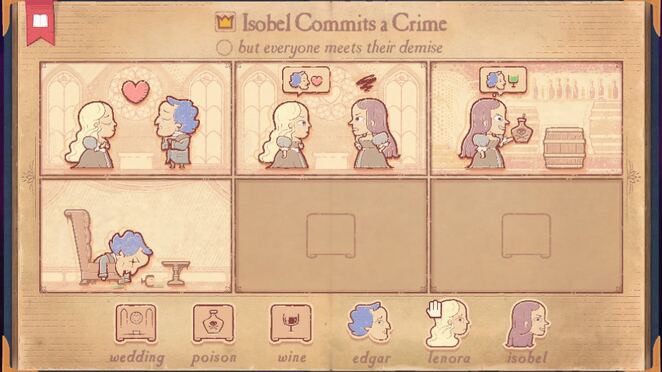
| Square Order – Steps to Follow: Start with the Wedding scene. Place Edgar alongside Lenora. Continue with the Wedding scene. Place Edgar alongside Isobel. Progress to the Poison scene with Isobel. Conclude with the Wine scene involving Lenora. This sequence tells the story of Isobel’s involvement in a crime, marked by a series of intriguing scenes. |
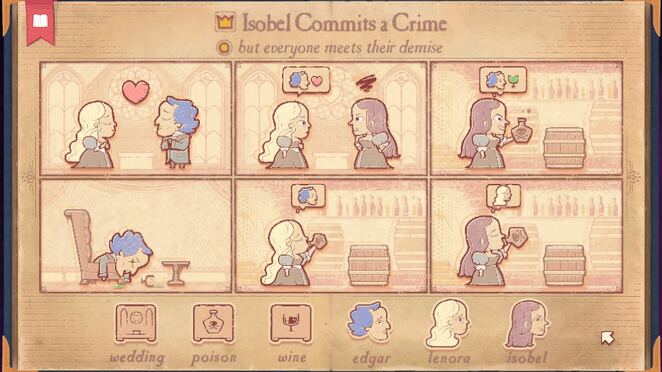
| Instructions to Follow Steps 1-4: Proceed as per the instructions in the first through fourth squares from the previous scenario. Step 5: Introduce the Poison scene with Edgar. Step 6: Include the Poison scene with Isobel. |
Storyteller Chapter 5 – Beauty
1. Curse
- Title: “Curse is Lifted”
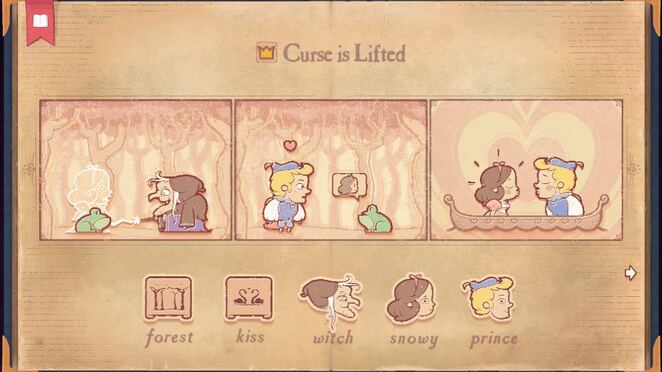
| Square Order – Steps to Follow: Start with the Forest scene. Place Snowy alongside the Witch. Continue with the Forest scene. Place Snowy alongside the Prince. Conclude with the Kiss scene. Place Snowy alongside the Prince. This sequence narrates the process of breaking a curse involving Snowy, the Witch, and the Prince. |
2. Deceit
- Title: “Prince Saves Tiny”
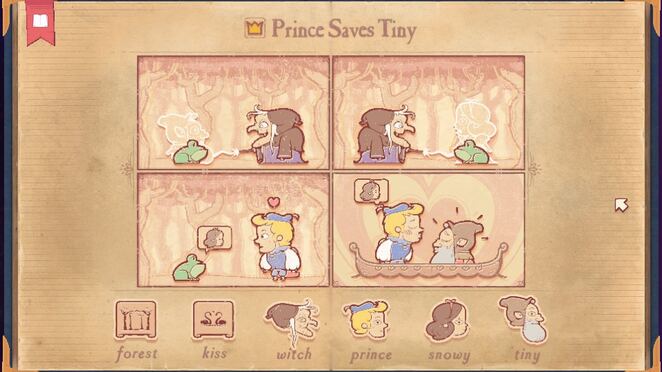
| Square Order – Steps to Follow: Start with the Forest scene. Place the Witch and Tiny. Continue with the Forest scene. Place the Witch and Snowy. Progress with the Forest scene. Place the Prince alongside Snowy. Conclude with the Kiss scene. Place the Prince alongside Tiny. This sequence tells the story of how the Prince saves Tiny with the help of Snowy and the Witch. |
3. Competitor
- Title: “Witch Becomes the Mirror’s Favorite“

| Square Order – Steps to Follow: Begin with the Mirror scene. Place the Witch. Continue with the Cauldron scene. Place the Witch. Progress to the Forest scene. Place the Witch and Snowy. Return to the Cauldron scene. Place the Witch. Conclude with the Mirror scene. Place the Witch. This sequence tells the enchanting tale of how the Witch became the favored companion of the magical Mirror. |
4. Inclusive
- Title: “The Mirror Praises Everyone”

| Square Order – Steps to Follow: Commence with the Mirror scene and position Peachy. Proceed with the Mirror scene and seat Hatey. Continue to the Cliff scene. Position Peachy near the precipice and Hatey alongside her. Return to the Mirror scene with Hatey. Revisit the Cliff scene. Position Hatey near the cliff and Peachy beside him. Conclude with the Mirror scene featuring Froggy. This sequence unfolds the enchanting tale of the Mirror’s admiration for each character. |
Storyteller Chapter 6 – The Manor
1. Murder
- Title: “Butler’s Rampage“
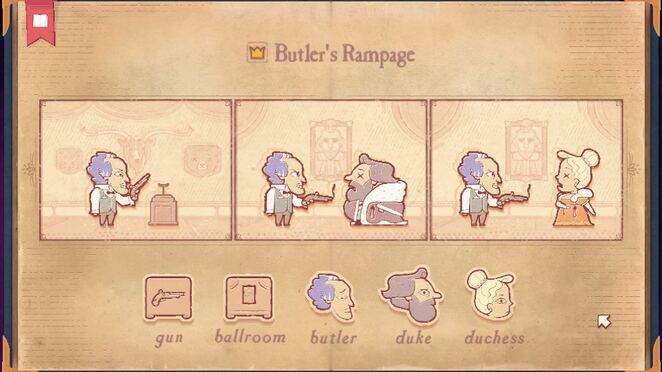
| Square Order – Steps to Follow: Initiate the Gun scene featuring the Butler. Progress to the Ballroom scene. Position the Butler and the Duke. Continue with the Ballroom scene. Place the Butler and the Duchess. Unveil the unfolding drama within the grand ballroom orchestrated by the Butler. |
2. Weapon
- Title: “Duke Feels Relief“

| Square Order – Steps to Follow: Commence with the Gun scene featuring Butler. Proceed to the Gun scene involving Duke. Revisit the Gun scene with Butler. Conclude with another Gun scene featuring Duke. Unlock the narrative as Duke finds solace amidst gun scenes. |
3. Fingerprints
- Title: “Detective Arrests Murderer“

| Square Order – Steps to Follow: Begin with the Gun scene featuring the Detective. Progress to the Gun scene with Butler. Continue by placing Butler and Duke in the Ballroom scene. Return to the Gun scene involving Butler. Move on to the Gun scene with the Detective. Conclude by placing Butler and Detective in the Ballroom scene. The detective successfully apprehends the murderer in this sequence of scenes. |
4. Innocence
- Title: “Detective Arrests Innocent”

| Square Order – Steps to Follow: Commence with the Gun scene featuring Butler. Proceed to the Ballroom scene and position the Butler and Duchess. Return to the Gun scene with Butler. Advance to the Gun scene involving Duke. Continue with the Gun scene featuring Detective. Conclude by setting the Ballroom scene with Duke and Detective. In this sequence, the detective mistakenly arrests an innocent individual. |
Storyteller Chapter 7 – Crown Intrigue
1. Rivals
- Title: “Four Deaths“
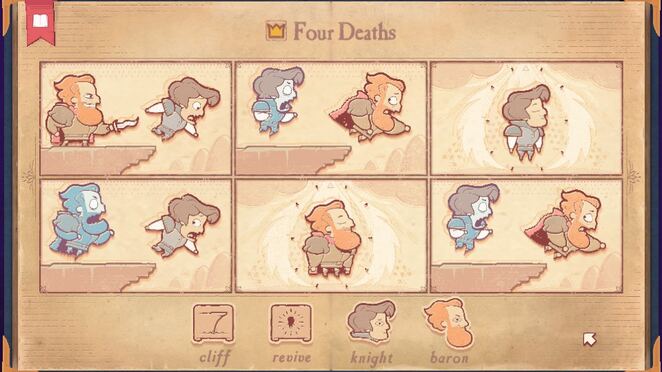
| Square Order – Steps to Follow: Start with the Cliff scene, placing Knight near the edge and Baron next to him. Continue with the Cliff scene, positioning Baron near the edge and Knight next to him. Introduce the Revive scene involving Baron. Include the Revive scene with Knight. Repeat the first and second squares for a total of six scenes. In this sequence, the narrative unfolds with two tragic deaths. |
2. Rescue
- Title: “The Queen Marries“
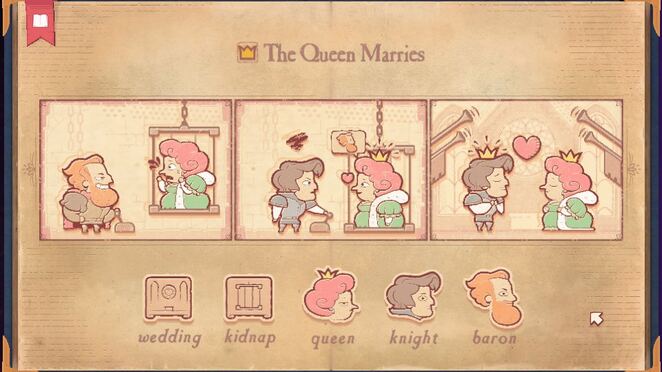
| Square Order – Steps to Follow: Begin with the Kidnap scene, placing the Queen in the cage with the Baron beside her. Continue with the Kidnap scene, positioning the Knight beside the Queen. Conclude with the Wedding scene, where the Knight and Queen unite in matrimony. In this sequence, the narrative unfolds as the Queen embarks on a journey that takes her from captivity to a royal wedding. |
3. Usurpers
- Title: “Everyone Sits on the Throne“

| Square Order – Steps to Follow: Commence with the Throne scene, placing the Queen in her regal seat. Proceed to the Cliff scene, positioning the Queen next to the edge and the Baron beside her. Return to the Throne scene, this time with the Knight taking a seat. Navigate to the Cliff scene once more, this time situating the Knight near the edge and the Baron next to him. Conclude with the Throne scene, where the Baron assumes his place of authority. In this sequence, the characters take turns occupying the throne, creating a dynamic narrative. |
4. Suitor
- Title: “The Queen Marries”

| Square Order – Required Actions: Initiate the wedding scene, Queen and Baron. Disguise scene featuring the Baron. Follow with the Kidnap scene, positioning the Queen within a cage and the Baron beside her. Transition to the Disguise scene with the Baron. Progress to the Kidnap scene once more, this time situating the Baron next to the Queen. Culminate with the Wedding scene, uniting the Queen and Baron in matrimony. This sequence unfolds a captivating narrative of the Queen’s marriage amid intrigue. |
Storyteller Chapter 8 – Secrets
1. Red-Handed
- Title: “Detective Arrests Murderer”

| Square Order – Required Actions: Commence with the Gun scene involving Butler. Continue to the Witness scene with Detective. Progress to the Ballroom scene featuring Butler and Duke. Conclude with the Ballroom scene involving Butler and Detective. This sequence unveils the detective’s successful arrest of the murderer, with compelling scenes that add depth to the narrative. |
2. Thief
- Title: “Butler Gets Fired“
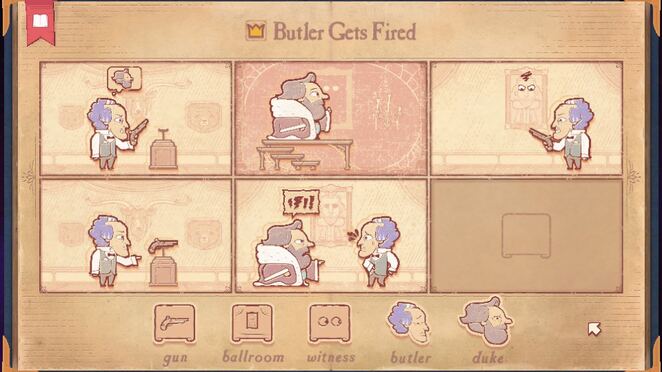
| Square Order – Required Actions: Initiate the Witness scene featuring Duke. Proceed with the Gun scene involving Butler. Transition to the Ballroom scene with Butler. Continue with another Gun scene, this time focusing on Butler. Conclude with the Ballroom scene involving Duke and Butler. This sequence unfolds the story of Butler’s termination in a dramatic fashion. |
3. Revenge
- Title: “Spouse Gets Vengeance“

| Square Order – Required Actions: Commence with the Gun scene involving Butler. Progress to the Witness scene featuring Duchess. Transition to the Ballroom scene with Butler and Duke. Resume with another Gun scene, focusing on Butler. Continue with a Gun scene involving Duchess. Conclude with the Ballroom scene featuring Butler and Duchess. This sequence portrays the story of a spouse seeking vengeance in a dramatic fashion. |
4. Report
- Title: “Duchess Gets Butler Arrested”

| Square Order – Required Actions: Initiate the Gun scene involving Butler. Follow with the Witness scene featuring Duchess. Proceed to the Ballroom scene with Butler. Continue with the Ballroom scene involving Duchess and Detective. Advance with the Ballroom scene featuring Duchess and Butler. Conclude with the Ballroom scene involving Butler and Detective. This sequence narrates a story where the Duchess takes charge to have the Butler arrested while facing the absence of the Duke. |
Storyteller Chapter 9 – Justice
1. Treason
- Title: “Usurper Dies”

| Square Order – Required Actions: Commence with the Kidnap scene, placing the Queen in a cage alongside the Baron. Transition to the Throne scene featuring Baron. Proceed with the Execute scene, showing Baron executing the Queen. Return to the Kidnap scene, this time placing Baron in a cage next to the Knight. Shift to the Throne scene, showcasing the Knight. Conclude with the Execute scene, illustrating the Knight executing Baron. This sequence narrates a dramatic tale where a Knight confronts and ultimately executes a Usurper. |
2. Unforgiven
- Title: “Knight Loses His Head”

| Square Order – Required Actions: Initiate the Death scene. Position Queen on the grave with the Knight beside her. Progress to the Throne scene featuring the Knight. Follow with the Revive scene for the Queen. Transition to the Kidnap scene. Place the Knight in the cage alongside the Queen. Shift to the Throne scene, showcasing the Queen. Conclude with the Execute scene, depicting the Queen executing the Knight. This sequence narrates a tragic tale where a Knight meets his demise at the hands of the Queen. |
3. Amnesia
- Title: “The Execution”

| Square Order – Required Actions: Commence with the Kidnap scene. Place the Queen in a cage alongside Baron. Follow with the Amnesia scene, involving the Queen. Return to the first square. Progress to the Wedding scene, featuring Baron and Queen. Conclude with the heart-wrenching Execute scene, where Baron tragically executes the Queen. This sequence portrays a somber narrative of the Queen’s fate, involving abduction, memory loss, an ill-fated wedding, and ultimately, execution. |
4. Misfortune
- Title: “Queen Suffers Four Tragedies”

| Square Order – Required Actions: Initiate the Kidnap scene. Place the Queen in a cage alongside the Baron. Continue with the Amnesia scene, involving the Baron. Revisit the initial scene. Conclude with the heart-wrenching Execute scene, where the Queen tragically executes the Baron. This sequence narrates a tragic tale of the Baron’s downfall, encompassing abduction, memory loss, and ultimately, execution. |
Storyteller Chapter 10 – The King
1. Noxious
- Title: “Cyclic, Mutually Toxic Love Affair”
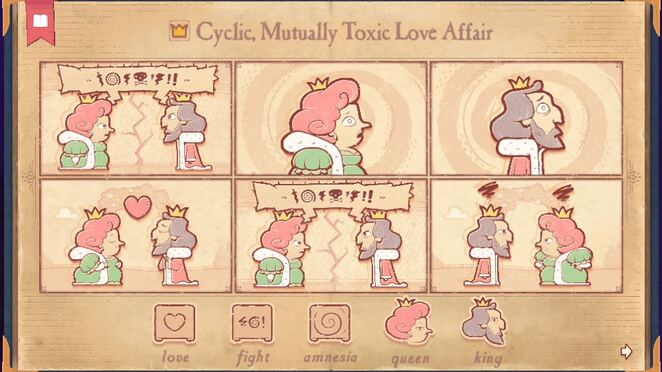
| Square Order – Required Actions: Initiate the Love scene involving the King and Queen. Follow with the Fight scene between the King and Queen. Create an Amnesia scene involving the King. Continue with an Amnesia scene, this time with the Queen. To emphasize the cyclical nature of this affair, revisit and repeat the first and second scenes. This sequence encapsulates the tumultuous and repetitive nature of a love affair characterized by toxicity and conflict between the King and Queen. |
2. Spite
- Title: “Double Execution”
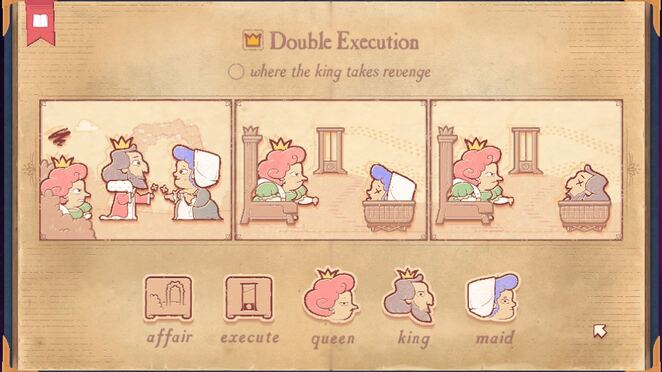
| Square Order – Required Actions: Commence with the Affair scene. Position the Queen in the bush with the King and Maid beside her. Progress to the first Execution scene, where the Queen executes the Maid. Continue the sorrowful tale by revisiting the previous step, this time with the Queen executing the King. This sequence portrays a tragic narrative of dual executions within the context of an affair. |

| What You Must Do 1st-3rd Follow the first two squares of the previous step. Add the Execute scene with the King executing the Queen. |
3. Promotion
- Title: “Rags to Royalty”

| Square Order – Required Actions: Start with the Wedding scene featuring the King and Queen. Proceed to the Affair scene. Position the Queen in the bushes with the King and Maid nearby. Transition to the Kidnap scene. Place the Maid in a cage and position the Queen next to her. Continue with the Kidnap scene. This time, position the King next to the Maid. Shift to the somber Execute scene, where the King executes the Queen. Conclude with the Wedding scene, featuring the King and Maid. This sequence depicts a dramatic tale of transformation from humble beginnings to royal status. |
4. Machiavelli
- Title: “Baron Rules Alone”

| Square Order – Required Actions: Commence with the Wedding scene featuring the King and Queen. Transition to the Cliff scene. Position the Queen next to the precipice with Baron at her side. Return to the Wedding scene, now with the King and Maid. Proceed to the Cliff scene again. Place the King next to the abyss with Baron beside him. Once more, perform the Wedding scene, this time with Baron and Maid. Conclude with the final Cliff scene. Position the Maid next to the edge with Baron accompanying her. This sequence depicts the Baron’s solitary rule over his kingdom, marked by weddings and perilous cliffs. |
Storyteller Chapter 11 – Monsters
1. Werewolf
- Title: “Bernard Drinks Poison”
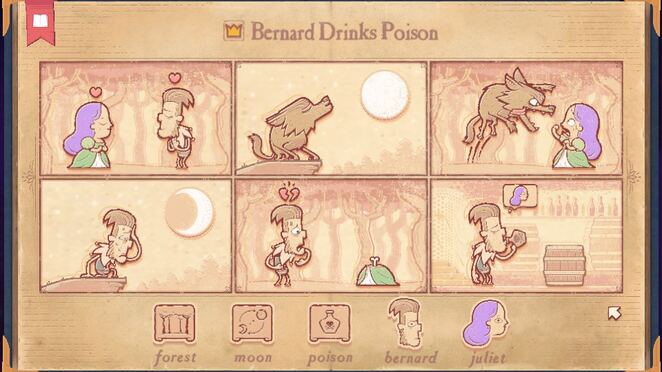
| Square Order – Required Actions: Begin with the Forest scene featuring Bernard and Juliet. Proceed to the Moon scene with Bernard. Recreate the first square. Recreate the second square. Recreate the first square once more. Conclude with the Poison scene, where Bernard drinks the lethal concoction. This sequence tells the story of Bernard’s ill-fated encounter with poison. |
2. Dragon
- Title: “Queen Gets Baron Arrested”

| Square Order – Required Actions: Initiate the Disguise scene with Baron. Progress to the Ballroom scene featuring Baron and Queen. Recreate the first square. Introduce the Ballroom scene with Queen and Detective. Include the Disguise scene with Detective. Conclude with the Ballroom scene involving Detective and Baron. This sequence unveils a captivating narrative where the Queen orchestrates the arrest of the Baron. |
3. Vampire
- Title: “Cured of Vampirism”

| Square Order – Required Actions: Commence with the Professor scene featuring Mina. Transition to the Night scene showcasing Mina and Dracula. Recreate the initial square. Introduce the Professor scene with Jon. Include the Crypt scene starring Dracula and Jon. Conclude with the Night scene involving Mina. This sequence illustrates the process of curing vampirism, with Mina at the center of the transformation. |
4. Professor
- Title: “Monster is Slain”
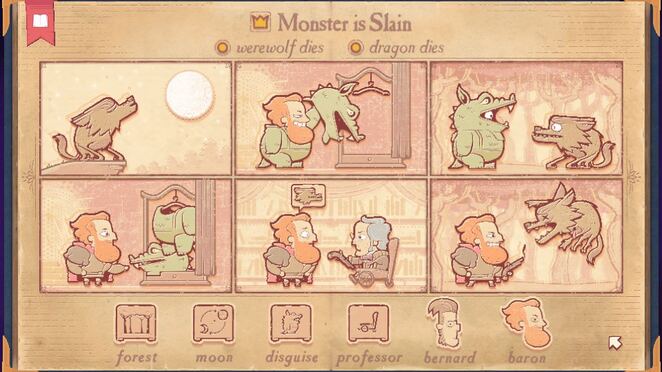
| Square Order – Required Actions: Begin with the Disguise scene featuring Baron. Continue with the Professor scene involving Baron. Recreate the initial square. Replay the second square. Introduce the Moon scene starring Bernard. Conclude with the Forest scene featuring Bernard and Baron. This sequence narrates the demise of a menacing monster and the tragic fate of a werewolf. |

| Instructions to Follow Step 1: Begin with the Disguise scene featuring Baron. Step 2: Transition to the Professor scene involving Baron. Step 3: Continue with the Professor scene featuring Bernard. Step 4: Conclude with the Forest scene, including both Baron and Bernard. |
Storyteller Chapter 12 – Drama
1. Oedipus
- Title: “Hatey Murders Father and Marries Mother”

| Sequential Tasks to Complete Include the wedding scene featuring Tiny and Peachy. Incorporate the family scene where Tiny stands on the left and Hatey is beside him. Depict the wedding scene involving Hatey and Peachy. Illustrate the cliff scene with Tiny near the precipice and Hatey beside him. Reiterate the third step. Add the family scene with Peachy on the left and Hatey next to her.” |
2. Grudge
- Title: “Tiny Avenges His Brother”

| Sequential Actions Required Introduce the family scene, positioning Peachy on the left with Greeny by her side. Include the fight scene between Hatey and Greeny. Depict the cliff scene, placing Greeny near the edge with Hatey alongside. Incorporate the family scene again, this time with Peachy on the left and Tiny beside her. Introduce the séance scene featuring Tiny and Greeny. Conclude with the cliff scene, positioning Hatey near the edge and Tiny beside him.” |
3. Salome
- Title: “Hatey is Murdered by His Daughter”
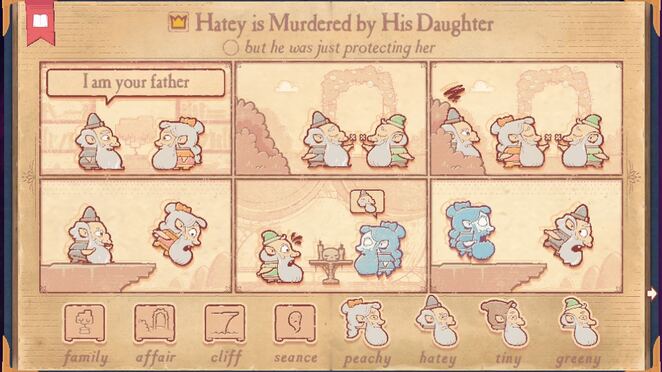
| Step-by-Step Instructions Begin with the family scene, placing Hatey on the left and Peachy beside him. Proceed with the affair scene, depicting Hatey in the bushes with Peachy and Tiny next to him. Continue with the affair scene, but now have Hatey in the bushes with Tiny and Greeny beside him. Transition to the cliff scene, positioning Tiny near the edge with Hatey by his side. Illustrate the séance scene featuring Peachy and Tiny. Conclude with the cliff scene, positioning Hatey near the edge and Peachy beside him.” |
4. Godot
- Title: “Tiny and Hatey Wait Forever”

| Sequential Actions to Perform Commence with the wait scene, featuring Tiny and Hatey. Continue with the wait scene for the subsequent steps (2nd through 5th). Conclude by revisiting the initial square, repeating the waiting scene with Tiny and Hatey.” |
Storyteller Final Chapter – Novels
1. Mad Husband
- Title: “Edgar Murders His Wife”

| Step-by-Step Instructions Commence with the wedding scene, featuring Edgar and Lenora. Include the wedding scene with Edgar and Isobel. Depict the poison scene involving Isobel. Illustrate the wine scene with Lenora. Return to the wedding scene with Edgar and Isobel. Continue with the séance scene featuring Edgar and Lenora. Incorporate the poison scene with Edgar. Conclude with the wine scene involving Isobel.” |
2. Mini Hamlet
- Title: “Tiny Murders Uncle to Avenge His Father”

| Sequential Actions to Complete Begin with the wedding scene featuring Bluey and Peachy. Move on to the family scene, positioning Greeny on the left with Bluey beside him. Continue with the family scene, but now place Greeny on the left with Hatey beside him. Progress to the family scene again, this time placing Bluey on the left with Tiny beside him. Transition to the wedding scene with Hatey and Peachy. Depict the cliff scene, positioning Bluey near the edge with Hatey beside him. Include the séance scene featuring Tiny and Bluey. Conclude with the cliff scene, placing Hatey near the edge and Tiny beside him.” |
3. Loose End
- Title: “Duke shoots Detective to avoid Prison”
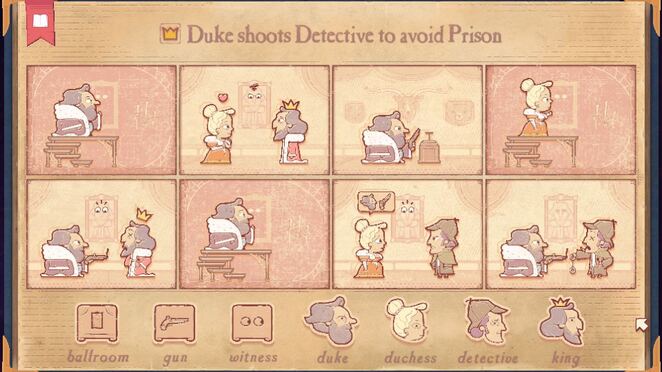
| Step-by-Step Instructions Initiate with the witness scene featuring Duke. Proceed to the ballroom scene involving Duchess and King. Illustrate the gun scene with Duke. Transition back to the witness scene, this time with King. Return to the ballroom scene, now featuring Duke and Duchess. Revisit the witness scene with Duke. Continue with the ballroom scene, introducing the Detective and King. Conclude with the ballroom scene depicting Duke and Detective.” |
4. Love Revolution
- Title: “Knight and Maid Murder the Monarchs and Have an Affair”

| Step-by-Step Actions to Follow Commence with the affair scene, positioning the Queen in the bush with the King and Maid beside her. Transition to the kidnap scene, placing the King in a cage with the Queen beside him. Continue the kidnap scene, now adding the Maid beside the King. Progress to the kidnap scene, this time putting the Queen in a cage with the King beside her. Move on to the kidnap scene, positioning the Knight beside the Queen. Depict the cliff scene, positioning the King near the edge with the Knight beside him. Illustrate the cliff scene, placing the Queen near the edge with the Maid beside her. Conclude with the affair scene, leaving the bush empty and positioning the Knight and Maid beside each other.” |

